Monday 28 September 2009

Wedding Cake Update


Just a quick update on the cake's progress...after 6 hours in the oven and cooling overnight - it didn't come out of the oven until 8pm - I pricked over the top of the cake and spooned over 2 tablespoons of brandy, letting it soak into the cake. It was then wrapped in two layers of greaseproof paper and two layers of foil and stored in a container in the larder to mature...only two more cakes to make next week and then I can start looking for the icing materials...phew!

Sunday 27 September 2009

Wedding Cake

My elder son and his fiancee have set their wedding date for late December and part of my contribution to the event is the wedding cake. So, after much trepidation - how on earth will I ice and decorate this cake! - consideration - what size of cake? how many tiers? - and preparation - gather together all the ingredients, ensure I have the right size cake tins - I'm ready to make a start.

Again, Good Housekeeping Cookery Book has come to the rescue with quantities of ingredients for various sizes of cake and advice on what sizes to combine in tiers. I'm going to make a two tier round cake, 10" and 6" with a second 6" cake in reserve to produce extra portions as required. I've used my Christmas cake recipe as that's tried and tested and beautifully rich and the Handyman assures me that it is fruity and delicious. I'll leave the nuts out of the 6" cakes to cater for anyone with a nut allergy or who simply doesn't like nuts.

Today I've begun with the largest tier. The first thing to do was prepare the baking tin by lining it with 2 layers of greaseproof paper and placing a double band of newspaper lined with greaseproof paper around the tin. It really should be brown paper round the tin but my preparation went astray here and I forgot to buy some...oops!

Next thing to do is measure out all the ingredients (I've given the quantities for the 10" cake with the quantities for the 6" cake in brackets) starting with the fruit and nuts:

1lb 12oz (8oz) currants
13oz (4oz) sultanas
13oz (4oz) raisins
9oz (2oz) glace cherries
(washed, dried and quarter
ed)
5oz (1oz) mixed peel
5oz (1oz) flaked almonds

Then weigh the butter, sugar and lemon rind into a bowl:

1lb 2oz (5oz) softened butter
1lb 2oz (5oz) golden castor sugar
lemon rind, a little

and sieve the flour and spices into another bowl:

1lb 5oz (6oz) plain flour
1 level tsp (quarter level tsp) mixed spice
1 level tsp (quarter level tsp) cinnamon

finally beat the eggs together in another bowl and measure out the brandy into a cup:

9 (2½) large eggs
3 tbsp (1 tbsp) brandy

Now the fun begins...

Cream together the butter, sugar and lemon rind until light and fluffy. Add the beaten eggs a little at a time, beating well between each addition of egg. Gradually fold in the flour with a metal spoon, then fold in the brandy. Finally fold in the fruit and nuts.


I had to use my preserving pan to fit all the butter mixture, flour and fruit in. I also used by food processor to cream the butter and sugar together in batches and then mixed in the eggs using an electric whisk. The folding in of the flour and fruit I did by hand and it has done wonders for the muscle tone in my upper arms! A final stir of the cake for luck using a wooden spoon bought by G as a gift for Mum from a school trip to Wales many moons ago, lots of memories and love in this cake.

When everything is thoroughly mixed together, spoon the cake mixture into the prepared tin making sure that there are no air pockets and make a slight hollow in the centre to ensure an even top when cooked.

Place in a preheated oven 150C for 6hrs (2½-3hrs)until a fine skewer in the centre comes out clean. Cover the top of the cake with greaseproof paper after 1½ hrs and for the 10" cake reduce the heat of the oven to 130C after 4 hrs. When cooked leave to cool in the tin before turning out onto a wire rack. Wrap the cool cake in a double thickness of greaseproof paper and place upside down in an airtight tin. Cover the tin with foil to store.

All that's left to do now is wash up and wait 6 hours to see the results!


As for the icing and decoration, well I'll be building myself up to that over the coming weeks and have engaged the help and artistic talents of my niece, O. No doubt I'll provide further news on progress in later posts - wish me luck!

Sunday 13 September 2009

Crab Apples and Mint

So hedgrow crab apples and loads of garden mint - makes Apple Mint Jelly. As it was such a pretty September day I took the apples, chopping board, knife and pot outdoors to prepare the apples for the jelly. A mixture of hedgrow apples and crab apples from our two small trees.

The mint for the recipe is Holly Grove Apple Mint, soft, almost furry, very minty leaves...here's the recipe...

Apple Mint Jelly
Makes about 2-3lbs
Ingredients
2lbs 8ozs crab apples, washed and
chopped
1pt water with 1 tbsp lemon juice added
1pt distilled vinegar
3 sprigs HG apple mint leaves


1lb 8ozs granulated sugar
3tbsp HG apple mint, chopped
green food colouring, optional

Method
Put the prepared apples, sprigs of mint and the water in a large pan. Bring to the boil then reduce heat, simmer for about 40 minutes until the apples are very soft and pulpy, stirring occasionally. Add the vinegar and bring back to the boil. Boil gently for 5 minutes. Remove the pan from the heat and place apple mixture in
a jelly bag and strain overnight. Do not squeeze the jelly bag or your jelly will end up cloudy.

The following morning measure the liquid and put into a large pan and discard the pulp. Add 1lb of sugar to each pint of liquid. Bring to the boil stirring continuously to dissolve the sugar. Boil rapidly for 10 minutes and test temperature - when it reaches 221F the jelly h
as reached setting point. Remove from the heat and allow to cool slightly. Remove the scum from the jelly with a slotted spoon, stir in the chopped mint (a quarter teaspoon of green colouring may be added at this point) then leave to cool for about 5 minutes. Stir the jelly to disperse the mint and then pour into warmed, sterilised jars. Seal and label.

Wednesday 9 September 2009

Forbidden Fruit

The countryside in this part of the world is lovely, a fact that we sometimes lose sight of being surrounded by this natural beauty all the time. It's not picture postcard lovely, much more real and rural than that. After our three hour walk through the countryside the Handyman and I returned to Holly Grove for a cup of tea and the last two pieces of Aunt N's fruit cake.

This prompted me to restock the cake tin with a variation on a carrot cake us
ing more HG apples:


Forbidden Fruit Cake
Ingredients
8 ozs soft tub margarine or softened butter
8 ozs soft light brown sugar

4 eggs, beaten
8 ozs plain wholemeal flour
2 level tsps baking powder

1 tsp mixed spice
12 ozs HG apples, peeled and coarsely grated
finely grated rind and juice of 1 large lemon
5 ozs walnut pieces, chopped

3 ozs full fat soft cheese
2 ozs icing sugar

Method
Cream the fat and sugar until light and fluffy. Add the eggs a little at a time beating until combined. Sieve together the flour, baking powder and mixed spice. Fold the flour into the creamed mixture. Add the apples, lemon rind and 1 tbp of the lemon juice and mix well. Add 4 ozs of the chopped walnut pieces (reserving the remaining 1 oz for the topping) and fold in gently.

Place the mixture in an 8" greased and lined cake tin and put into a preheated oven at 180C for 1 hour and 30 minutes. Cover the top of the cake with a piece of greased greaseproof paper after about 1 hour to prevent the top becoming too brown.

Meanwhile make the topping by beating together the cream cheese, icing sugar and the remaining lemon juice.

Allow the cake to cool and cover the top with the cream cheese topping and sprinkle over the remaining chopped nuts.

...and the forbidden fruit of the title...well, think of the Garden of Eden and living at Holly Grove is pretty close and we have the apple trees too!

Tuesday 8 September 2009

Marrow and Cheese Supper Dish

I've been searching for courgette/marrow recipes since discovering my giant courgettes a few days ago. Now, I could make more chutney or jam but I'm running out of jars and still have the damsons and apples to preserve, so Nigel Slater to the rescue! I've found a recipe for Courgette and Lancashire Cheese Crumble that will use up about a half of one of my marrow and provide us with a tasty autumnal supper.

In Nigel's the 'kitchen diaries' cookbook he makes his version on the 23rd of September and, as the recipe title says, uses Lancashire cheese with rosemary as the herb. I'm making my version on the 8th of September and using a strong Cheddar cheese and sage for the herb...good idea to adapt the recipe? Time and tasting will tell. So here's my version of Nigel's crumble...


Marrow and Cheddar Cheese Crumble

Makes 4 hearty helpings
Ingredients
For the tasty base

1 thick slice butter
1 onion, coarsely chopped
1 leek, sliced
1 tbsp HG sage leaves, finely chopped
4 small HG potatoes, scrubbed and cut into cubes
2 lbs HG marrow, skinned, deseeded and cut into cubes
150 ml vegetable stock
3 ozs Cheddar cheese, grated

For the crumble
4 ozs tomato ciabatta (or other bread)
3 ozs hazelnuts
1 tbsp HG sage leaves
2 ozs Cheddar cheese

Method
Melt the butter in a heavy based pan. Add the leek and onion and cook gently until softened. Add the chopped sage and the potatoes, stir well and then place a lid on the pan and cook gently for about 10 minutes. Add the marrow and cook for a further few minutes, then add the vegetable and replacing the lid cook again for about 5 minutes. Place the contents of the pan into a casserole dish.

Meanwhile prepare the crumble topping. Put the bread into a food processor and grind until coarse breadcrumbs, then add the walnuts and the sage leaves and chop until combined with the breadcrumbs. Finally add the Cheedar in small chunks and combine again. You now have your crumble topping.

Sprinkle the grated cheese over the top of the marrow mixture and then cover with the crumble mixture. Place in a pre-heated oven 180C for 35-40 minutes until the top is crisp and golden. Serve with salad and crusty bread to soak up the lovely juices.

The verdict from the Handyman is 'delicious! more please!'

Monday 7 September 2009

Damsons for Jam

We have a number of damson trees in the hedgrows at Holly Grove. The first year at HG I picked the damsons too early, though I did make some good damson cheese with them, and last year we had no damsons at all, I put that down to a very wet and windy April. This year we have a fantastic crop and I've resisted picking them until they are fully ripe.


The Handyman has been keeping an eye on them for ripeness and with the news that they were ready, yesterday morning I selected the first batch to make some damson jam. A
simple jam recipe, the hardest part is extracting the stones from the jam before potting. And this morning I was rewarded with Holly Grove Damson Jam on my toast - it had set beautifully and retained the sharpness of the fruit - lovely!


Holly Grove Damson Jam

Makes about 5lbs
Ingredients
2lbs 8ozs HG damsons
3lbs granulated sugar
15 fl ozs water

Method
Wash the damsons and place them in a preserving pan with the water. Bring to the boil and then simmer gently for about 30 minutes or until the fruit is soft and liquid has reduced. Remove from the heat and add the sugar, stirring until dissolved.

Return the pan to the heat and bring to the boil. Boil rapidly, stirring frequently, for about 10-15 minutes. Remove the pan from the heat and test using a sugar thermometer - when a temperature of 221F is reached the jam is ready. Remove from the heat and leave to cool for 15 minutes.

Using a slotted spoon remove the stones from the jam and then pour into warmed, sterilised jars. Cover and label and store in a cool, dark place.

Friday 4 September 2009

More Marrow (and Apple) Magic

Marrow from the greenhouse and apples off the tree, add time to prepare and a little care and you have Marrow and Apple Chutney. This is a recipe from one of my Mum's cookbooks - Good Housekeeping 1985 edition. I love using my Mum's books and finding her scraps of paper marking the pages of her favourite recipes or a new one she wanted to try - I've inherited the practice, lots of paper markers in my cookery books, and a new one now marking this recipe:


Marrow and Apple Chutney
Makes 6lbs

Ingredients

4lbs marrow, peeled and cut into chunks
3ozs salt
2lbs HG apples, peeled, core and chopped
1lb HG onions, chopped
1lb soft brown sugar

2pts distilled vinegar
1 level tsp ground ginger

½oz pickling spice 

Method
Put the chopped marrow pieces in a large bowl layered with the salt and leave overnight. This will draw out the excess liquid from the marrow. Next day rinse the marrow pieces and drain off the water and place them in a preserving pan.

Add the apples, onions, sugar, vinegar, ginger and spices. Bring to the boil, then reduce the heat and simmer gently, uncovered, for about 2 hours, stirring from time to time, until the chutney becomes thick with no excess liquid.

Pour into warmed, sterilised jars and seal immediately. Label when cool and store in a cool, dark place for 1-2 months before using.

Pickling Spice

Pickling spice is a mixture of various spices to be added to the vinegar when making pickles and chutneys. Black peppercorns, red chillies, allspice, cloves, ginger, mustard seed, fennel seed, cardamom may be included. Here's a mix for pickling spice that can be varied according to your taste:

Ingredients
1 level tbsp mustard seed
1 level tbsp whole cloves
1 cinnamon stick, broken in 2 pieces
4 cardamom pods
6 black peppercorns
1 bay leaf, crumbled

Method
Mix all the ingredients together and store in an airtight jar in a cool dark place (not the fridge). Will keep for up to one month. Weigh out the required amount for your recipe and tie in a muslin bag to use.

Thursday 3 September 2009

Marrow Magic

What to do with a 9lbs 3ozs marrow? Two recipes come to mind: a lovely Warming Marrow soup that I first experimented with a few years ago when I went on holiday leaving a few courgettes and came home to a rather large couple of marrows - though nothing on the scale of this beauty.

And then, how about a Marrow and Apple chutney - using up some more HG apples and most of this large marrow. Firs
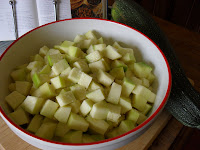
t thing to do with the marrow is peel, deseed and chop it into chunks - no mean feat, the skin was very thick and the flesh dense, so it took all of my muscle to cut through the marrow and then skin it. When I'd finally finished I had 5½lbs of marrow flesh - the skin was consigned to the compost heap and some of the seeds saved to be dried out for planting next Spring.

I put 4lbs of the marrow into large bowl layered with 3ozs rock salt, cove
red with clingfilm and left overnight to remove excess water - this marrow will be used in a Marrow and Apple chutney recipe - look out for a future post.

The remainder of the marrow - 1½lbs - was used for the Warming Marrow soup. A delicious soup that freezes well, so make more than you need and you'll have a taste of late Summer well into the Autumn - here's the recipe:

Warming Marrow Soup
Mkes 8-10 servings

Ingredients

1½lbs HG marrow, cut into chunks

1 large onion, chopped (or 2 small HG onions, chopped)
2 large HG carrots, diced
1 leek, sliced
a handful of HG runner beans, sliced
3 small HG garlic cloves, crushed
good glug of sunflower oil
1 tbsp cumin powder
salt and freshly ground black pepper

2½pts vegetable stock or water
hot chilli sauce,
to taste

Method

Place marrow, onion, leek, carrots, runner beans and crushed garlic in a large soup pot. Add a goodglug of sunflower oil and stir. Place over a medium heat with the lid on the pan. Cook gently for about 5-10 minutes, stirring occasionally. Add the cumin powder, salt and pepper and stir to mix through the vegetables. Add the vegetable stock or water and bring to the boil. Turn the heat down to achieve a slow simmer and let the soup cook for about 1 hour - a longer cooking time is better than a shorter time. When all the vegetables are soft blitz with a hand held blender - I prefer a little texture left in the soup, though it is equally nice if made very smooth - then add some hot chilli sauce, tasting as you go until it is hot enough for your palate. Serve with crusty bread.

I've just added some caulifower florets and a couple of HG potatoes cut into chunks to the soup to provide a more substantial supper for the Hndyman and me this evening. We'll be eating late - soup and pudding evening - Warming Marrow Soup followed by Apple and Blueberry Crumble with Custard - yummee!

Tuesday 1 September 2009

Hedgerow Bounty

I walked through the lanes near Holly Grove yesterday morning scouting for blackberries. Such a slowpaced and pleasant activity, scanning the hedges for the beautiful black jewels, a lovely way to spend a late August morning. Time to let thoughts drift and allow eyes and ears to contemplate the diversity of an English hedgrow and its wildlife. The hedgrows surrounding our garden are made up of holly covered in green berries, hawthorn with its red berries, ivy, damson, hazel, dog rose, honeysuckle, sycamore and brambles.

So, after an hour or two of forraging I returned to the HG kitchen with one and a quarter pounds of hedgrow blackberries - so what to do with them...blackberry and apple cheese. Fruit cheeses are firm and can be cut into wedges or slices. Best served as an accompaniment to cold meats or dairy cheeses, or cut into slices and dredged in sugar and served as a sweetmeat.

So with the apples on one of the trees ready to pick I gathered the last of the red and white currents to augment the blackberries and set off to make:

Blackberry and Apple Cheese
Makes about 2lbs
Ingredients
2lbs blackberries (I used 1lb 4ozs blackberries and 12ozs red and white currents)
1lb apples, cut into chunks with skin and core intact
grated rind and juice of 1 lemon
1lb 12 ozs granulated sugar, warmed

Method
Put all the fruit and the lemon rind and juice in a preserving pan and pour in enough water to come half way up the fruit. Bring to the boil, then uncover and simmer for about 20 minutes or until the fruit is very soft.

Leave the fruit to cool slightly, then press the mixture through a sieve into a bowl, using the back of a spoon. Measure the puree into the cleaned preserving pan adding 14ozs sugar for every 1 pint of puree.

Gently heat the puree, stirring, until the sugar dissolves. Increase the heat slightly and cook for around 50 minutes, stirring frequently, until very thick - you should be able to see the base of the pan when a wooden spoon is drawn through the mixture.

Spoon the blackberry and apple cheese into warmed, sterilised jars. Seal and label the jars, then store in a cool, dark place for 2-3 months to dry out slightly.
Related Posts Plugin for WordPress, Blogger...